
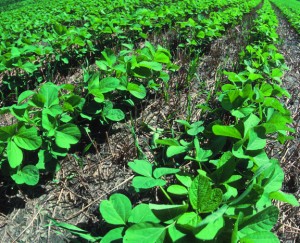
Many areas have acidic soils, which prevent plants from fully using soil nutrients. For food plots, the more acidic the soil, the more fertilizer you must apply to achieve the same results. Because fertilizer costs significantly more than bulk field lime, applying lime on acidic soils is a cost saver and can be a tremendous benefit to many plantings.
by Steve Bartylla
When deciding on when, how, where and what kind of lime to use on your deer hunting food plots, you should keep a few things in mind. Not all limes are created equal. They all take time to break down to a beneficial state, and their impact decreases through time.
Common barn lime is a poor choice for food plots. Because it’s very coarsely ground, an unacceptably high percentage of the lime won’t break down into a beneficial state.
Field limes are ground much finer and produce vastly superior results. However, they still take time to break down in the soil. In fact, a spring application does little good until the next spring.
Pelletized lime, often referred to as pell lime, is more expensive than field lime but much faster acting and efficient. In fact, with the right soil conditions and rainfall, its effects can be seen in a month rather than a year. Also, because of its increased efficiency, just more than 1,500 pounds of pell lime is the equivalent to one ton of field lime. Along with increased cost, the drawback is that it leeches through the soil faster.
For first-year plantings, I often use a combination of field and pell lime. For example, if the test called for 4 tons of lime per acre, I’ll apply 400 pounds of pell lime per acre along with 2.5 tons of field lime the first year, with another 1-ton application of field lime the next year. That way, the planting receives some liming benefit right away while reducing costs long term.
Regardless of the type of lime applied, the soil can only handle so much at once. It’s recommended to apply no more than 3 tons per acre in a year. So when soil tests call for 5 tons, split it into 2.5 tons this year and 2.5 the next.
Remember, conducting a soil test is simple and an important step toward ensuring a productive food plot. Doing so reveals the precise amount of lime and fertilizers required to give the plot ideal levels of soil nutrients for growth. The planting can then yield increased quantities of forage and better withstand stresses, such as drought or overgrazing.
The only tools required to collect soil samples are a sandwich bag and a large spoon or small trowel. If you will take samples from more than one plot, label the bags to match the plot.
At somewhat evenly dispersed locations throughout the plot, use the spoon to collect 4-inch-deep scoops of dirt, and place them in the bag. If the samples are spread through the plot, filling the bag with dirt will provide a good average for the soil quality of the area.
There isn’t an exact number of samples that should be taken. About 10 is typically enough to fill the bag and provide adequate sample areas to produce an accurate picture.
Bring the labeled bags to nearly any feed mill, ag department or county soils service office. For a small fee, they will send the samples to a lab for analysis. If you tell them what you’d like to plant, they’ll usually generate a report providing the specific levels of fertilizer and lime the soil requires for that planting.
-
Made for small food plots, this 10 lb. bag contains enough seed to plant a 4,500 sq. ft personal food plot. You can plant it in late summer or early fall and it can last from 6 to 9 months. No need to till the soil, just clear it of existing vegetation.