This method of boning a fresh deer carcass is simple when you know what to do, and easy because the deer carcass hangs right in front of you at the best cutting level.
My buddy Jim has boned-out several dozen deer using this method over the past 40 years. I worked with him on many of them when we owned deer hunting land together and hunted together.

(I’m the best leg holder in the business, keeping the carcass from spinning. My wife, Judy, is good, too.)
Yes, I know how to make all the cuts and have done so several times, but I’m nowhere nearly as efficient or as fast as Jim. He is a pro. Here’s why he is a pro:
- Jim grew up on a farm. In high school he was on the Wisconsin State Champion Meat Judging Team which went on to win national honors.
- He went to a major Midwestern land-grant-state university’s College of Agriculture, majoring in meat and animal science.
- As an undergraduate, he worked four years in the College of Agriculture Meat Science lab. The lab’s main work was harvesting and processing research animals, including beef cattle, hogs, veal calves and lamb. The processing took place after the graduate students completed their research measurements. All harvested animals were broken down, cut, trimmed and packaged into retail style cuts to be sold to the public, with generated proceeds to help finance the facility.
- His entire professional career included production management throughout the food industry, specializing in harvesting, boning, retail, processing and food service.
- He has hunted deer for 68 years and processed well over a hundred deer.
- His advice on knife selection is a top quality six-inch boning knife. He recommends using a steel stropping tool to keep the knife edge clean of fat and tallow. When the steel no longer puts an edge on the knife it is time to resharpen the blade.
His knowledge of meat carcasses, meat cutting and meat processing is second to none. I trust him and follow his advice.
Since I’ve helped with or done my own deer butchering since my late teens, grew up on a farm butchering and processing animals, and have enjoyed every bite of venison I’ve eaten — except when my Dad didn’t get ALL the tallow removed before it was cooked and Mom cooked and served it with tallow that, as it cooled, stuck to the roof of my mouth — I have learned a thing or two about the best ways to butcher, process, wrap, freeze, thaw and cook venison — greatly influenced and taught by my wife Judy.
Hanging the Carcass
To begin your work, make a knife cut between the heavy tendon and the leg bone just above the knee joint on each hind leg (on a hanging carcass). Then slide a gambrel’s hooks into those two cuts and hook the gambrel onto a secure hoist. Hang the field-dressed carcass by the hind legs on this secure hoist.
(A battery-driven hoist makes it easy to adjust the carcass’s hanging height for easiest cutting.)
An alternative is to hang a chain over a tractor front-end loader and hook the chain ends securely over both hind legs, then lift the front-end loader. This is a great way to hang the carcass because of your ability to raise it up and down with the loader.
Next, select a good quality boning knife with a six-inch blade. Sharpen the boning knife. A sharp knife is safer. A sharp knife will save time and effort. It also will help you make cuts more accurately and easily.
If you have to use a whetstone to sharpen the blade, that’s alright. However, you will probably be happier using an electric sharpener. Buying one is well worth the expense. With an electric sharpener, do coarse stone first and then the fine stone. Follow the manufacturer’s directions.
Test the blade on a piece of standard writing paper. The blade will cut the paper smoothly when properly sharpened. If the blade catches on the paper, do more sharpening work.
Do not test the blade on your thumb or a finger. The only blood should come from the venison, not your finger.
Trimming the Carcass
You will need pails for the waste and a clean container for usable trimmings before beginning the trimming process.

Use a sharp knife to trim all loose hair, fat and silver skin from the exterior carcass surfaces. (For this removal, it is much easier to use the weight and resistance from the hanging carcass to cut against.) Don’t worry if you trim off a bit of lean, usable meat in this process. If the piece is worth saving, cut the lean meat away from the fat or silver skin and put it in a separate container for grinding or for use in sausage later.

NOTE: Some photos show the carcass not completely trimmed. Over time, Jim has found doing all of the trimming on the carcass is a more efficient process than trimming one area at a time.
Boning Prep
- Try not to let meat freeze before the final trimming and prep work.
- It makes no difference whether you start with front quarters or hind quarters.
- These procedures are designed to create roasts from most of the hind quarters and stew meat or trimmings for grinding/sausage from the front quarters. All roasts may be steaked out as desired, with steaks from the loins (backstraps) being the most tender, and steaks from round roasts (hams) the next most tender.
From a young deer, Jim makes roasts for freezing and makes steaks later, which will remain fresher than when cutting them into steaks right away. Use your discretion on steaking older animals, considering tenderness.
If your plan is for boneless meat for grinding or sausage (older animal or personal preference) follow the same procedures; however, you do not need to be careful about cutting up and damaging the roasts/steaks.
Boning Out the Carcass, Boning Out Rounds (Hams)
Step 1

Separate the sirloin tip from the bottom round at the seam (the thin, unseen tissue that encases each muscle group and holds each muscle group together as a unit).
Step 2

Make a cut perpendicular to the femur at the knee joint and cut around the knuckle to the femur.
Step 3
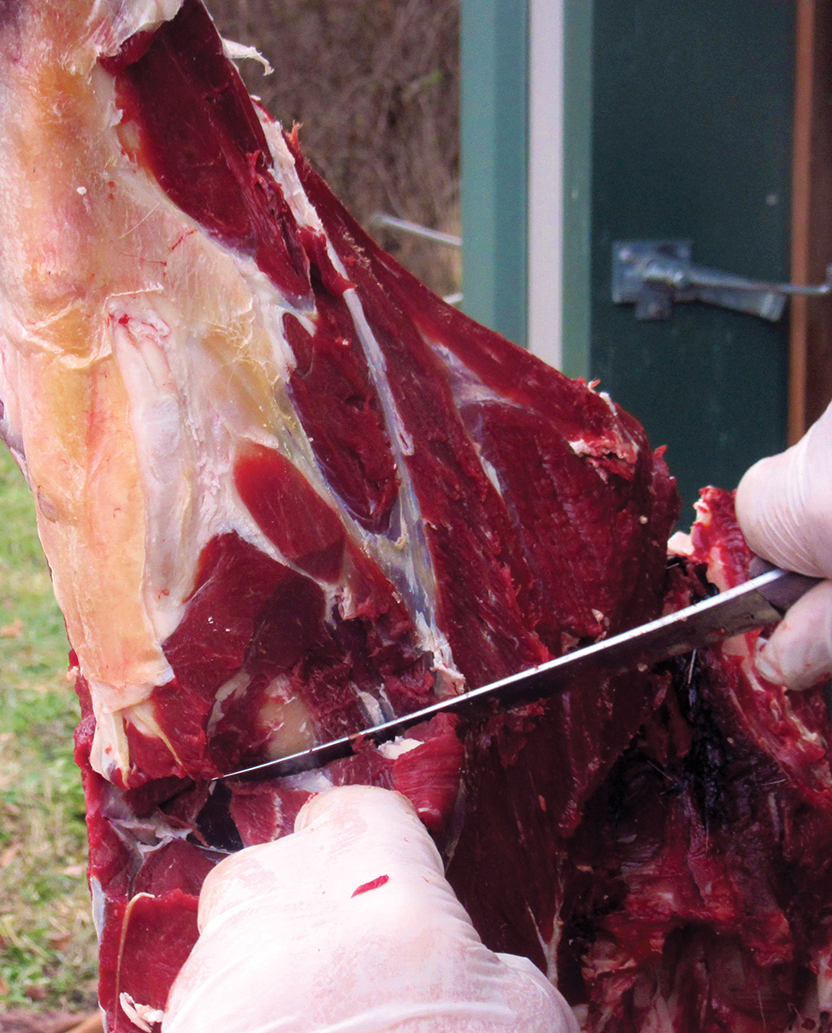
Plan to make a square knife cut across the femur. With knife tip toward the seam, make the cut, being sure you follow the femur down to the hip joint.
Step 4
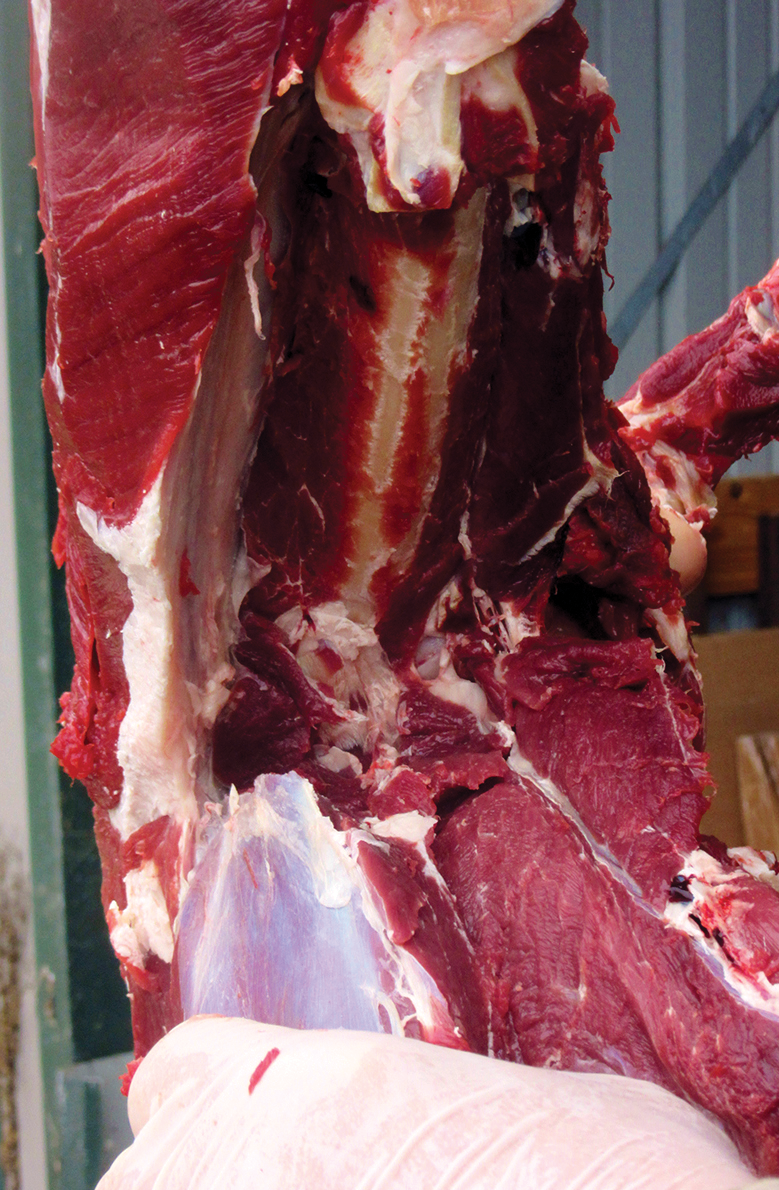
Remove the sirloin tip by pulling it away and down from the carcass. Cut as necessary to remove it.
Step 5
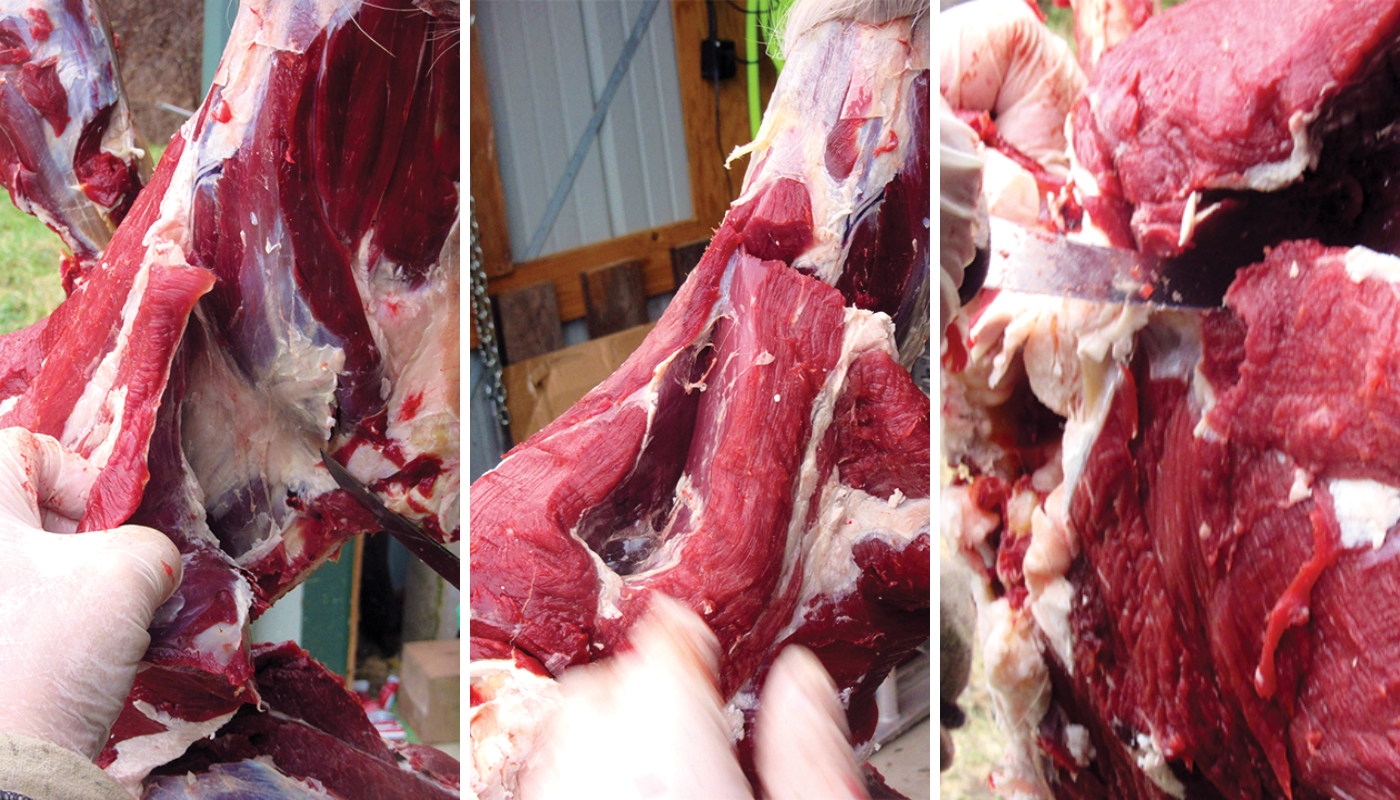
Begin removal of bottom round by cutting meat away from the knee joint adjacent to where the sirloin tip was removed. Pull and cut the muscle away from the top round/bottom round seam and the femur bone. Follow the top/bottom round seam to separate up to hip bone.
Step 6

Separate bottom round from hip bone by following the hip bone. Separate bottom round at seams from bottom sirloin, continue to follow seam until completely removed. Note that the cuts around the backbone require three cuts to get around the joint.
Step 7

By following the backbone vertebra, remove the sirloin.
Step 8

Begin removal of the top round…
Separate the top round off the hip bone by following the hip bone down to the knuckle joint. (Note where Jim’s hand is holding the carcass steady.) This is how the hip bone slopes to the knuckle joint.
Step 9

Cut top round off the bone, with the first cut at the top of the hind leg where the muscle begins. Continue to peel the top round muscle off the bone until it is free.
Step 10

Remove any remaining usable meat from the bones. Put this meat with the trim for grinding.
** You are now ready to begin on the front quarters. It is easier and more sensible to remove the shoulders before boning out the loins (backstraps). Removing them makes the backstraps more accessible **
Boning Out the Front Quarters
Step 11
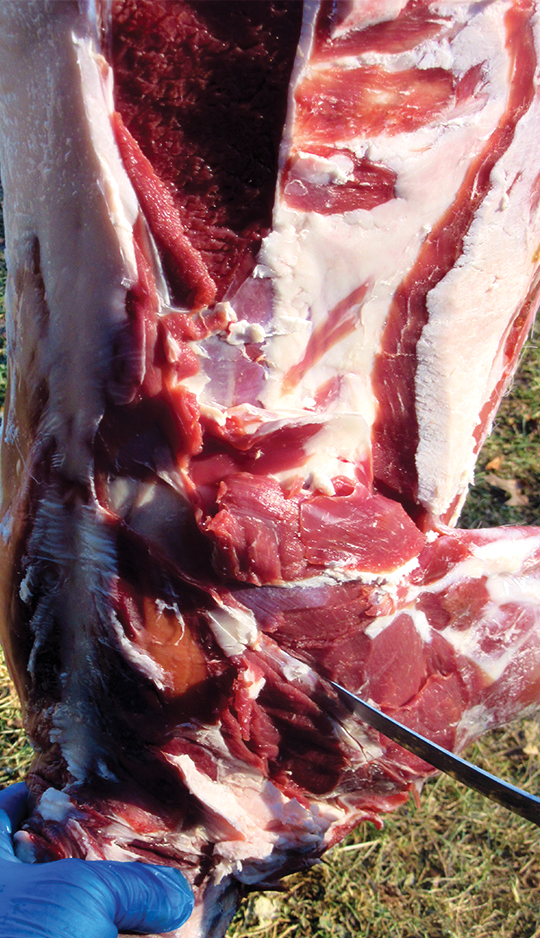
Begin removal of neck meat by an initial cut just below the blade bone and open up so shoulder blade roasts are exposed.
Step 12
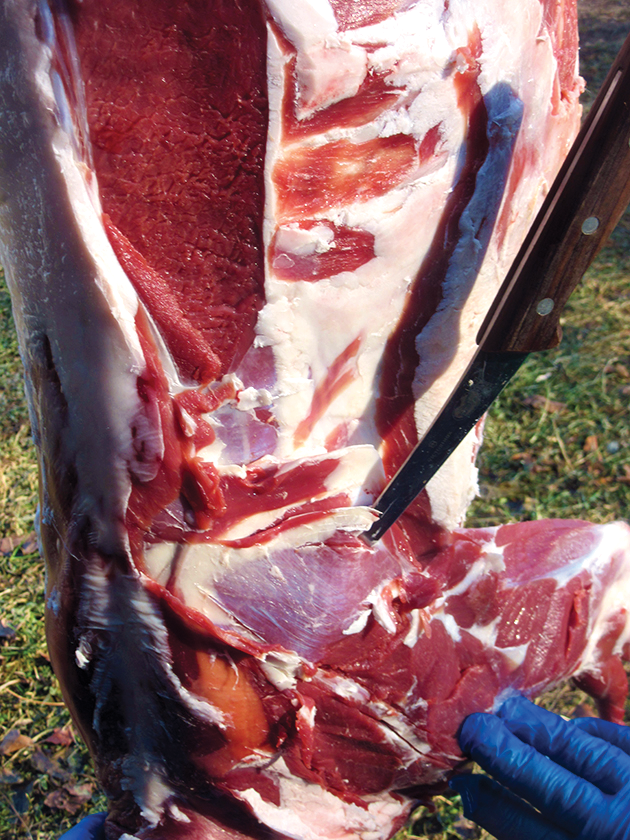
Remove flat shoulder blade roast by angling your knife flat against the blade bone and peeling the meat off the bone keeping as tight to the bone as possible up to the blade bone ridge. Cut along the top of the ridge bone to complete removal of the muscle.
Step 13
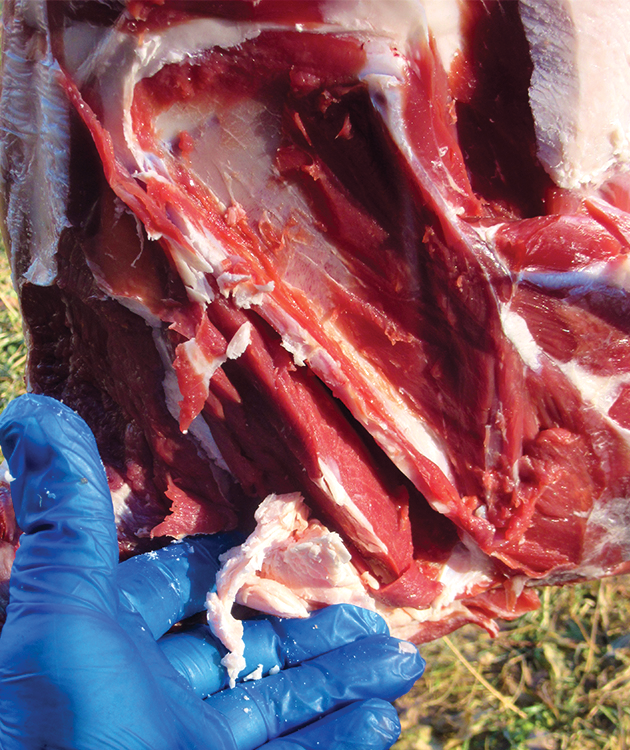
Begin removal of the scotch tenderloin (the smaller, less tender meat at the bottom of and behind the shoulder blade) by cutting along the opposite side of the blade bone ridge and following the bone curvature as tightly as possible to remove the muscle.
Step 14
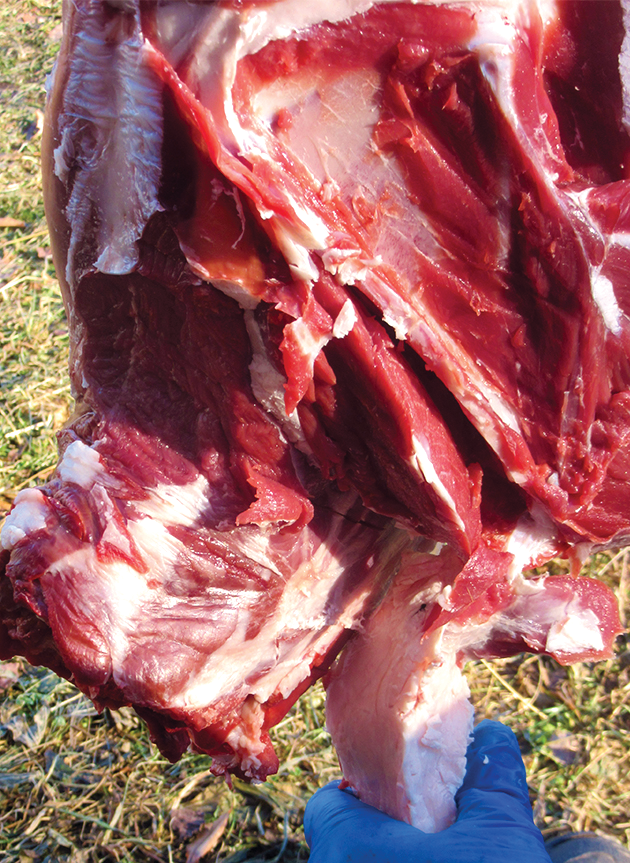
Complete removal of the scotch tenderloin and the neck meat by trimming away from the bones.
Step 15

Remove the remainder of the shoulder by cutting under the blade bone along the seams that separate the shoulder from the remaining carcass.
The remaining shoulder meat can be boned out on a cutting board.
Step 16

Trim any remaining usable meat from the carcass.
This will complete the front shoulders and will leave a nicely exposed loin (backstrap).
Boning Out the Loins (Backstrap)
Step 17
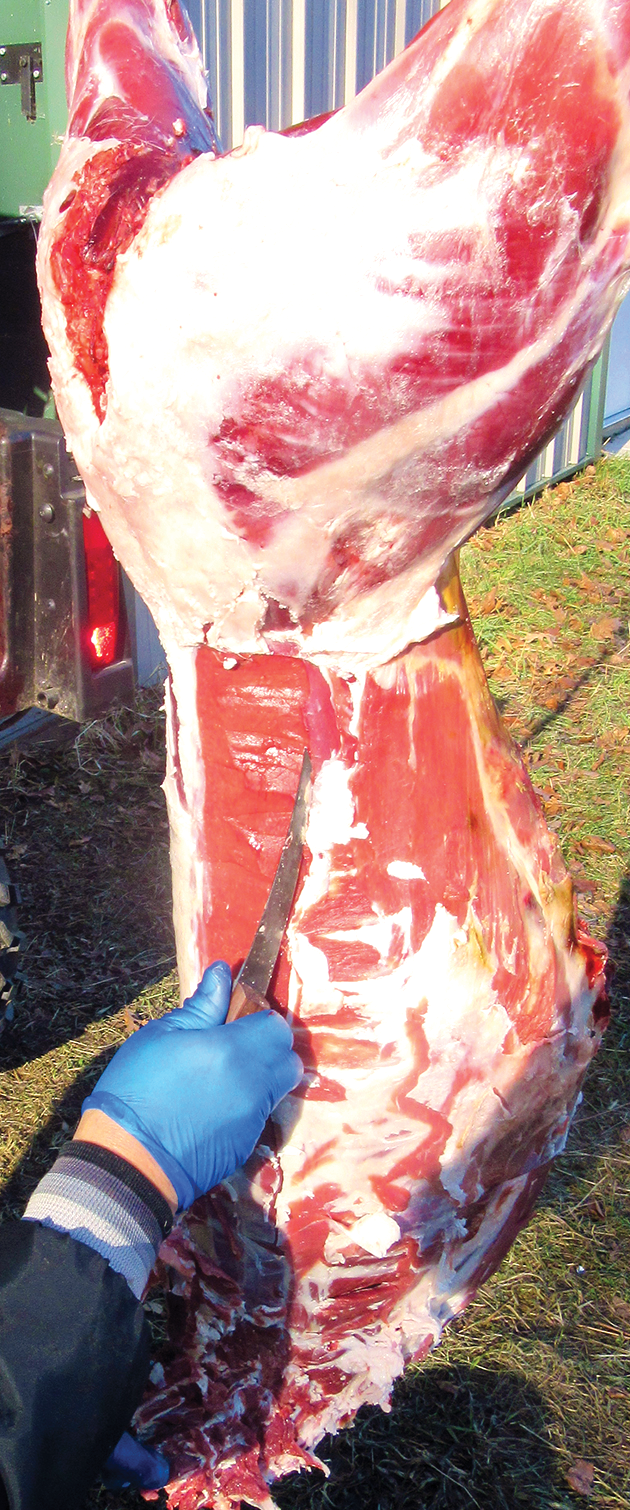
Begin removal of the loin (backstrap) by cutting along the lower edge of the muscle where it lays inside the rib bones. This is an angular cut at approximately 45 degrees.
Step 18

Make a cut perpendicular to the back and along the vertebrae and follow the vertebrae as close to the bone as possible to open the loin away from the backbone. Continue this cut all the way to the bottom of the neck.
Step 19

Begin removal of the loin (backstrap) by cutting just under the hip bone, approximately 45 degrees, down to the vertebra. Continue along the vertebra and backbone, cutting as close to the bones as possible to remove the muscle. Take your time and try to get as much meat as you can; this is your best quality meat on the animal. Continue to follow the backbone until the entire muscle is removed.
Step 20
Remove any remaining usable meat from the carcass for ground meat or sausage.
You have completed the boning task.
Try out some venison recipes:


